Whether you’re creating a tutorial, capturing a bug, or saving a moment from your favorite app, knowing how to record iPhone screen is essential. With built-in tools and a few smart tricks, you can capture high-quality screen recordings in seconds, no third-party apps required.
In this guide, we’ll walk you through everything you need to know about iPhone screen recording, including how to record with sound, how to do it without using Control Center, and how to troubleshoot common issues.
Table of Contents
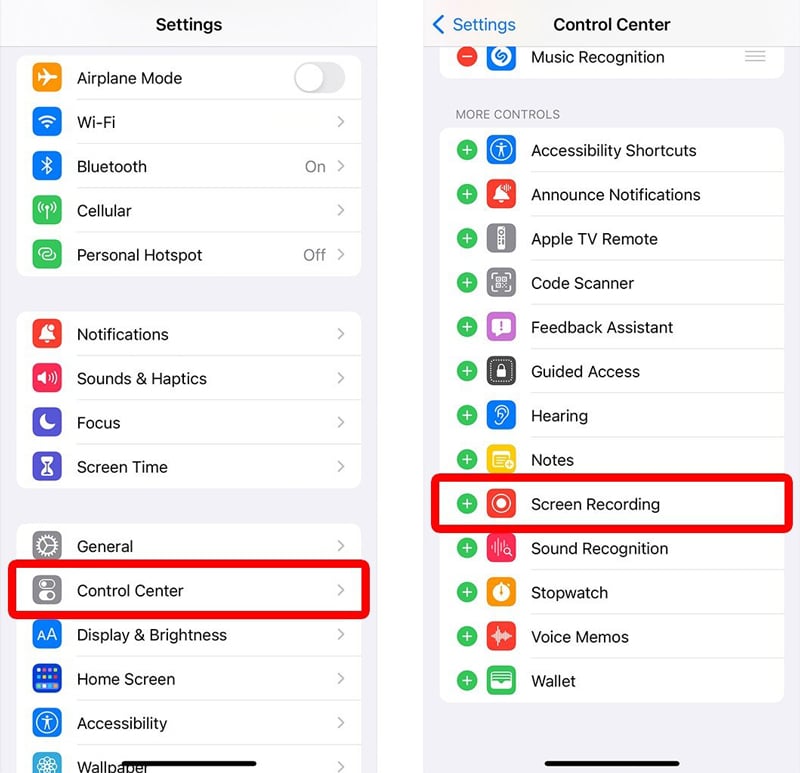
🔓 How to Enable Screen Recording on iPhone
Before you can start recording, you need to make sure the Screen Recording feature is added to your Control Center.
Steps:
Open Settings.
Tap Control Center.
Scroll down and tap the green + next to Screen Recording.
Swipe down from the top-right corner (iPhone X and newer) or up from the bottom (older models) to access Control Center.
You’ll now see a circular record icon, your gateway to seamless iOS screen capture.
🔊 How to Record iPhone Screen with Sound
Want to narrate your screen recording or capture in app audio? Here’s how to do it:
Steps:
Open Control Center.
Long-press the Screen Recording icon.
Tap the Microphone icon to turn it on (it turns red).
Tap Start Recording.
Now you’re recording both your screen and your voice whish is perfect for tutorials, walkthroughs, or commentary.
🚫 How to Record Screen on iPhone Without Control Center
If you can’t access Control Center (due to restrictions or accessibility settings), you can still initiate screen recording using Siri or Back Tap.
Option 1: Use Siri
Say: “Hey Siri, start screen recording.”
To stop: “Hey Siri, stop screen recording.”
Option 2: Use Back Tap (iOS 14+)
Go to Settings > Accessibility > Touch > Back Tap.
Choose Double Tap or Triple Tap.
Assign Screen Recording.
Now, just tap the back of your iPhone to start recording—no Control Center needed!
🎯 Tips for Better iOS Screen Capture
Clean your screen: Close unnecessary apps and notifications.
Use Do Not Disturb: Prevent interruptions during recording.
Landscape mode: Ideal for games and videos.
Edit afterward: Use the Photos app to trim or crop your recording.
There’s no fixed limit, but your recording is constrained by available storage.
🏁 Conclusion
Recording your iPhone screen is easier than ever thanks to built-in iOS tools. Whether you’re capturing gameplay, creating tutorials, or troubleshooting an issue, mastering iPhone screen recording puts powerful content creation at your fingertips.